Eggnog Ice Cream (#41) + Christmas Ice Cream Options

20 12 2012
Christmas tree

Our wee tree

Five day countdown!  The tree is up, the halls are decked, and our stockings hung by the gas fireplace with care.  Time to kick back with some rum and eggnog.

I must admit I was tempted to pour the rest of the carton of eggnog into my Donvier ice cream maker and call it Week #40, but that would be cheating.  Besides, anything made from scratch always tastes better!  I haven’t made homemade eggnog before, but I figured it’d be quite easy to capture the taste of this festive drink in ice cream format.  After all, the main ingredients for eggnog are pretty much the same as a basic ice cream custard: milk and/or cream, eggs, and sugar.  Add a sprinkling of holiday spices and a few glugs of alcohol, and there you go!

For this recipe, I added two extra egg yolks to the standard two eggs I typically use for a bit of extra richness.  If you’re after an ultra decadent treat, you could use six yolks and no whites.  Whichever you choose, make sure you add lots of freshly grated nutmeg to the custard — nutmeg is what gives eggnog its distinct taste.

If you’re not a fan of eggnog but still want to serve a Christmas-y flavoured ice cream for dessert, you still have plenty of other flavour options.  My top picks would be: Gingerbread Ice Cream, Spiced Rum Raisin Ice Cream, Cranberry Orange Ice Cream, Cacao Nibs and Mint Ice Cream, or Classic Vanilla Ice Cream with a half cup of crushed candy canes mixed in.

An early Merry Christmas to all!

Eggnog Ice Cream (Makes about 1 L)

2 eggs
2 egg yolks
3/4 cup white sugar
3 cups half-and-half cream
Pinch of sea salt
1 teaspoon vanilla
1 1/2 teaspoons freshly grated nutmeg (or to taste)
1/8 teaspoon ground cloves
1/8 teaspoon ground cinnamon
3 tablespoons rum

Read the rest of this entry »


Gingerbread Ice Cream (#40)

13 12 2012

Let me loose in a specialty food store and I’m like a kid in an ice cream parlour — giddy and over-excited.  Last week, my co-worker Leah and I squeezed in a lunch time trip to Galloway’s Specialty Foods.  If you’re a food nerd and haven’t been to Galloway’s, you must.  Every ingredient you could possibly need for cooking and baking can be found here.  French super-blue lavender flowers?  Yes.  Gluten free chestnut flour?  Yes.  Xanthan gum?  They’ve got that too.  If we weren’t pinched for time, I could have spent hours combing through all the aisles, looking at all the products, and learning ohhhh, so *this* is where I can buy beet powder!

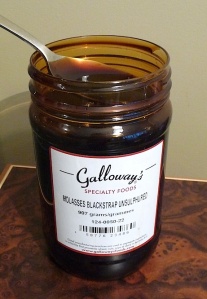
I wasn’t looking for anything particularly obscure during this shopping trip though — just unsulphured blackstrap molasses, the key ingredient in Week #40’s Gingerbread Ice Cream.

unsulphured molasses, blackstrap molasses, Galloway's Specialty Foods

Rich, sticky molasses

Molasses are typically made from sugar cane and come in three grades or varieties.  Light molasses is made by boiling sugar cane juice and extracting the sugar.  The residual syrup is mild and quite sweet, since relatively little sugar is removed from the sugar cane juice.  Dark molasses is produced during a second round of boiling and sugar extraction.  Blackstrap molasses is made when the syrup is boiled for a third time and most of the remaining sugar removed.  Blackstrap molasses has a dark and robust flavour and is quite high in nutritional value, especially for manganese, copper, iron, and calcium.  Lately, I’ve been stirring a spoonful into my coffee every morning!  Many people choose light or dark molasses for cooking and baking, with the concern that the taste of blackstrap molasses can be overwhelming and bitter.  Personally, I love the taste of molasses, so I used blackstrap for this ice cream recipe.

All three varieties of molasses can be sulphured or unsulphured.  Sulphured molasses is made from young sugarcane and contains sulphur dioxide as a preservative.  Unsulphured molasses is made from old sugarcane, which has a higher sugar content compared to the young stuff.  This higher sugar content acts as a natural preservative for the molasses, so there is no need to add a chemical preservative.  While sulphured and unsulphured molasses can be used interchangeably, I opt for unsulphured.  No chemicals for me, thank you very much!

When cooking the custard, I noticed it started to thicken up at 160 degrees F / 71 degrees C.  I tried to keep the custard on the flame a little longer to reach my standard 170 degrees F / 77 degrees C, but the custard definitely didn’t need any further heating.  Take it off at 160, otherwise you might end up with gingerbread scrambled eggs!!

Gingerbread ice cream is one of my new winter favourites.  As with other syrup-sweetened ice creams, it is quite scoopable even after an overnight in the freezer.  The molasses gives the ice cream a rich, dark flavour and the spices… well, they make the ice cream taste like Christmas 🙂  If you’re a fan of candied ginger, you might also want to add a 1/2 cup of finely chopped candied ginger to the custard in the final moments of churning.

Gingerbread Ice Cream (Makes about 1 L)

1/2 cup unsulphured molasses (light, dark, or blackstrap – your choice)
1/4 cup brown sugar
3 cups half-and-half cream
2 eggs
Pinch of sea salt
1 1/2 teaspoon ground ginger
1 teaspoon ground cinnamon
1/2 teaspoon ground cloves

Read the rest of this entry »


Pear Ginger Ice Cream (#37)

22 11 2012

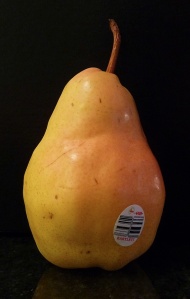
#4409.  The Bartlett Pear.  When bright green, it is crispy and tart with just a hint of pear flavour.  When golden yellow (be patience!), it is supple, juicy, and absolutely bursting with sweetness.

Bartlett pear

When fully ripe, Bartlett pears are golden yellow, sometimes with a tinge of pink.

Bartlett pears are extremely versatile in the kitchen.  They can be made into jams and chutneys, added to salads, used for baking, or dried and eaten as a snack.  A ripe pear — sliced, chilled, and with a squeeze of lemon — makes for the simplest of desserts.  But even better is a ripe pear cooked with some lemon, sugar, and fresh and ground ginger, then whirled into a gingery ice cream.  Indeed, it’s a triple whammy of ginger, but don’t worry, the sweet taste of the pears still emerges.

For an ultimate treat, serve a scoop of this ice cream with a simple yellow cake or with a fruit crisp.

Pear Ginger Ice Cream  (Makes about 1.25 L)

Ice Cream:

2 eggs
3/4 cup white sugar
2 tablespoons peeled, finely grated fresh ginger
3 cups half-and-half cream
1 teaspoon pure vanilla extract

Gingered Pears:

3 cups chopped pears (use really ripe ones)
2 tablespoons lemon juice
1/4 cup white sugar
2 tablespoons finely chopped ginger
1 teaspoon ground ginger
1/4 teaspoon cinnamon
1/4 teaspoon cloves
Pinch of sea salt

For the Ice Cream:

  1. In a heavy saucepan, whisk together the eggs and sugar.
  2. Add the ginger, 2 cups of the half-and-half, and the vanilla.
  3. Cook the mixture over medium-low heat stirring constantly, until the mixture is thick enough to coat the back of a wooden spoon (170 degrees F / 77 degrees C).
  4. Remove from heat immediately and add the remaining 1 cup of the half-and-half to stop the cooking.  Place the saucepan into an ice bath to cool the custard rapidly.
  5. Chill overnight in the fridge.

For the Gingered Pears:

  1. While the ice cream is chilling, prepare the gingered pears.
  2. Toss the pears with the lemon juice.
  3. Combine the pears, sugar, chopped ginger, and spices in a heavy saucepan.  Cook over medium-high heat, stirring occasionally, until most of the liquid has evaporated, about 8 to 10 minutes.
  4. Remove from the heat, cool, and chill overnight in the fridge.

To Finish:

  1. Strain the custard through a fine sieve into a bowl, pressing the ginger to extract as much liquid and gingery goodness as possible.
  2. Pour the custard into an ice cream maker and prepare according to the manufacturer’s instructions.
  3. In the final stages of churning, add the pear ginger compote and churn to distribute throughout the ice cream.
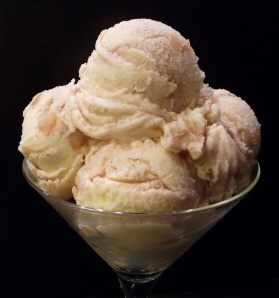
pear ginger ice cream

The Official Taster says: “A perfect partner to our apple crisp tonight.”


Pumpkin Pie Ice Cream (#30)

4 10 2012

Welcome, October!  Welcome, Fall!  Here are the top 10 things I love about this time of year:

10) Fall fashion (classy, sophisticated)
9) The return of soups and stews in the slow cooker
8) Halloween costumes
7) Mid-Autumn Festival
6) Harvest time in the garden (for others; alas, I have no garden!)
5) Beautiful colours in the trees
4) Crunching through leaves
3) Golden sunshine
2) Thanksgiving and time with family
1) Pumpkins

I especially love pumpkins.  How can you NOT have a smile on your face when you see a collection of pumpkins (and squashes and gourds) of all shapes, sizes, and colours?  Large, small, yellow, orange, white, green, cute, ugly, I love them all!  And they taste pretty good too.

pumpkins, squashes, Keremeos

Pumpkins galore in Keremeos, BC

This year, my sister will be hosting Thanksgiving dinner.  Rather than sticking with tradition and having pumpkin pie for dessert, I thought we could end dinner 52 Scoops style — with Pumpkin Pie Ice Cream.  You can use freshly cooked and pureed pumpkin or canned pumpkin for this recipe.  I opted for the latter and had great results.  If you use canned pumpkin, just be sure to use 100% pure pumpkin and do NOT use pumpkin pie filling.

Happy Thanksgiving and enjoy!

Pumpkin Ice Cream (makes about 1.5 L)

2 eggs
1 cup brown sugar
3 cups half-and-half cream
1 teaspoon cinnamon
1/2 teaspoon freshly grated nutmeg
1/4 teaspoon ground ginger
Pinch of sea salt
1 cup pure pumpkin puree

  1. In a heavy saucepan, lightly whisk together the eggs and sugar.
  2. Add 2 cups of the half-and-half cream, spices, and salt.
  3. Cook the mixture over medium-low heat stirring constantly, until the mixture is thick enough to coat the back of a wooden spoon (170 degrees F / 77 degrees C).
  4. Remove from heat immediately and add the remaining half-and-half to stop the cooking.  Place the saucepan into an ice bath to cool the custard rapidly.
  5. When the custard is cool, whisk in the pumpkin puree.
  6. Chill overnight in the fridge.
  7. Pour the custard into an ice cream maker and prepare according to the manufacturer’s instructions.
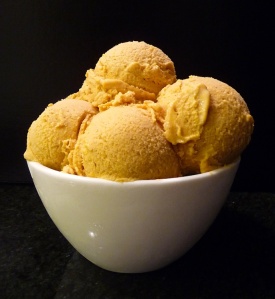
pumpkin pie ice cream

The Official Taster says: “Try it with a drizzle of maple syrup too!”


Apple Pie Ice Cream (#29)

27 09 2012

A few weekends ago, my parents, sister, and I went off on our annual wine tasting trip to the Okanagan.  I find mid-September — after Labour Day and before the Fall Okanagan Wine Festival — to be the best time to visit.  The roads are quiet, there are no insane crowds, fruits and veggies are at their prime, and the fall sunshine is warm and golden.  The place is beautiful.

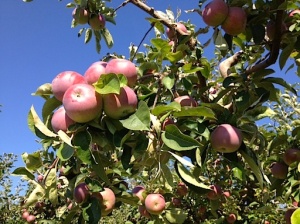
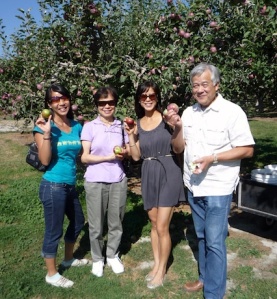
This year, we focused on wineries on the Naramata bench.  Tasting was, of course, our main focus, but I’d have to say that our most delightful stop was at Dream Acres, a small apple orchard beside Lake Breeze Winery.  We were drawn to Dream Acres’ road side fruit and jam stand and the gala apple trees that were growing right next to it — it was the cutest set up and the trees were absolutely laden with apples.  The owner just happened to be outside during our visit and invited us to pick some apples off his trees.  Not the galas though, these are my grand kids’ trees and they’d kill me if I let you pick off them!  He led us to his McIntosh grove instead, where we excitedly picked a couple dozen apples.  They were truly the most amazing, juicy apples I have ever tasted, and just 30 cents a pound to boot!

apple tree

McIntosh apples at Green Acres Orchard, Naramata BC

apple tree

Happy customers!

The apples just begged to be made into pie, but since I’m not in the business of making pie, Apple Pie Ice Cream it is then — the first of several ice cream recipes celebrating the tastes of fall!

This recipe involves pan frying apples with some cinnamon, sugar, and other warming spices, and then churning the fruit into a luscious vanilla ice cream base.  (I used the little McIntoshes, along with some Galas and Jonagolds I picked up in Keremeos on our way home.)  Don’t be scared by the intensity of spices if you sneak a taste of the apples before churning it into the vanilla ice cream.  When mixed together, the flavour mellows and you have a wonderfully balanced combination of sweet and spice.  Think apple pie à la mode (sans pie crust, since I’ve never been a huge fan of crust).  It’s a perfect dessert for those first days of fall.

Apple Pie Ice Cream  (Makes about 1.25 L)

Ice Cream:

2 eggs
3/4 cup white sugar
3 cups half-and-half cream
2 teaspoons of pure vanilla extract

Cinnamon Spiced Apples:

3 cups finely chopped apples
2 tablespoons lemon juice
2 tablespoons butter
1/4 cup brown sugar
1 1/4 teaspoons cinnamon
1/2 teaspoon freshly grated nutmeg
1/4 teaspoon allspice
1/4 teaspoon cloves
Pinch of sea salt

For the Ice Cream:

  1. In a heavy saucepan, lightly whisk together the eggs and sugar.
  2. Add 2 cups of the half-and-half cream.
  3. Cook the mixture over medium-low heat stirring constantly, until the mixture is thick enough to coat the back of a wooden spoon (170 degrees F / 77 degrees C).
  4. Remove from heat immediately and add the remaining half-and-half to stop the cooking.  Place the saucepan into an ice bath to cool the custard rapidly.  Stir in the vanilla.
  5. Chill overnight in the fridge.

For the Cinnamon Spiced Apples:

  1. While the ice cream is chilling, prepare the cinnamon spiced apples.
  2. Toss the apples with the lemon juice.
  3. Melt the butter in a non-stick pan over medium heat.
  4. Add the apples, sugar, and spices.  Cook over medium-high heat, stirring occasionally, until the apples are tender and all the liquid has evaporated, about 8 to 10 minutes.
  5. Remove from the heat, cool, and chill overnight in the fridge.

To Finish:

  1. Pour the custard into an ice cream maker and prepare according to the manufacturer’s instructions.
  2. In the final stages of churning, add the cinnamon spiced apples and churn to distribute throughout the ice cream.
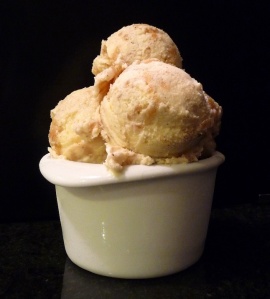
apple pie ice cream

The Official Taster was out of town at a conference this week, so my sister fulfilled the role of Guest Taster.   The Guest Taster says: “HOLY SH*T, this is gooooood ice cream!!!”


Hot Cross Buns Ice Cream a Grand Prize Winner!

7 06 2012

I’m thrilled to announce that 52 Scoops’ Hot Cross Buns Ice Cream recipe is the Grand Prize winner in Carrie’s Experimental Kitchen’s Home Grown Chef Contest, with 36% of reader votes!

A big shout out to friends, family, and fans who voted for 52 Scoops.  Thanks also to my fellow contestants — it was a pretty tight race at times!

I love classic ice cream flavours, but I also love unusual ice cream recipes — and Hot Cross Buns Ice Cream is one of my favourites so far.  Keep your eye out for more quirky & original 52 Scoops ice cream recipes in the weeks ahead.  And if you have any interesting ideas, please email me or post a comment!

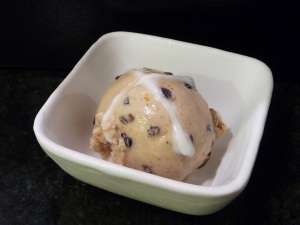
Hot cross buns ice cream

Hot Cross Buns Ice Cream – a prize winning recipe!


Hot Cross Buns Ice Cream a Candidate on CEK’s 2012 Home Grown Chef Contest!

29 05 2012

My recipe for Hot Cross Buns Ice Cream — an innovative original inspired by my Dad’s love for hot cross buns — is a candidate on Carrie’s Experimental Kitchen’s 2012 Home Grown Chef Contest!

The Top 5 most popular recipes, determined by the number of page views, will advance to the finals and be added to a poll for everyone to vote on.  Have a peek at my contest entry page.  And if you haven’t tried this recipe yet, what are you waiting for?

Hot cross buns ice cream

Hot Cross Buns Ice Cream – fruit, spice, and all things nice!

Thank you for continuing to support 52 Scoops!


Hot Cross Buns Ice Cream (#4)

5 04 2012

Update – June 7, 2012: This recipe won the Grand Prize in Carrie’s Experimental Kitchen’s Home Grown Chef Contest!

Happy Easter!  This calls for a special Easter ice cream recipe — something that goes beyond crushing a bag of Cadbury mini eggs and mixing them into vanilla ice cream (though that would probably be pretty tasty too).  Seeing that my dad has always been a fan of hot cross buns, I thought I’d try replicating the taste of this bakery treat in ice cream format for Easter this year.

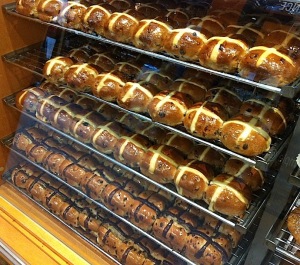
Hot cross buns at Cobbs Bakery at Lonsdale Quay Market

Hot cross buns are sweet, mildly spicy buns that are studded with currents and raisins and marked with a symbolic cross.  They’re an Easter tradition and typically served on Good Friday.  I think I’ve developed an ice cream recipe that hits just the right combination of spices, flavouring, and dried fruit.  Be sure to use the best quality spices and dried fruit you can find.  If you’re buying bulk from a grocery store, make sure their bulk products have a high turnover for greatest freshness — yes, you *can* taste the difference!

Note: After three weeks of using up to 50% whipping cream for the dairy portion of the custard base, I’m switching over to using 100% half-and-half.  While whipping cream does result in an ultra-premium taste and increases the scoopability of the ice cream, I’m convinced that continued high usage will wreak havoc on my waistline, even if I use Baby Donvier and make smaller portions!  Don’t worry, using half-and-half does not significantly affect taste.  In fact, you might also want to experiment further and cut the half-and-half with some milk.

Hot Cross Buns Ice Cream  (Makes about 1 quart)

2 eggs
3/4 c brown sugar
3 cups half-and-half cream
1/2 tsp cinnamon
1/4 tsp allspice
1/4 tsp nutmeg (use freshly ground, if possible!)
1/4 tsp cloves
1/4 tsp sea salt
2 tsp orange zest, finely chopped
2 tsp lemon zest, finely chopped
1/2 cup currants
1/3 cup golden raisins

Icing (optional):

1/4 cup icing sugar
1/8 tsp pure vanilla extract
1 tsp milk

Read the rest of this entry »